In summary:
- Successful glyphosate-free termination depends on hitting the cover crop’s vulnerable stage (anthesis) and achieving a high biomass threshold.
- Roller-crimping is only effective at flowering (anthesis) when stems are brittle and biomass is sufficient to create a weed-suppressing mat.
- High-density “flash grazing” with sheep offers a rapid termination method but requires careful management to avoid soil compaction.
- Drilling into heavy residue demands specific equipment: sharp discs, high down-pressure, and aggressive row cleaners are non-negotiable to prevent “hairpinning”.
- A mandatory 4-6 week gap between termination and drilling is critical to break the “green bridge” for pests like aphids.
The familiar dread of a wet spring is a reality for many regenerative farmers. You’ve cultivated a magnificent, dense cover crop all winter, building soil structure and sequestering carbon, only to face a relentless drizzle that makes termination feel impossible. The conventional answer, a quick pass with glyphosate, goes against every principle you’re working towards. Yet, the clock is ticking for spring drilling, and the risk of the cover crop turning from an asset into a yield-robbing weed is very real. Many guides will suggest common solutions like roller-crimping or grazing, but they often gloss over the critical details that spell the difference between success and a costly failure.
The truth is that moving away from chemical termination isn’t about finding a single magic bullet; it’s about becoming a master of timing, biomass, and mechanics. The key to success in a challenging wet spring lies not in what you do, but in understanding the unforgiving details of *how* and *when* you do it. A roller-crimper used a week too early is just a steamroller, and a poorly managed grazing mob can cause more harm than good through compaction. True resilience comes from knowing the biological weak points of your cover crops and matching them with the right mechanical force under the right conditions.
This article moves beyond the basics to give you the operational playbook you need. We will dissect the science behind why specific techniques work, explore reliable winter-kill options, detail the non-negotiable equipment setups for drilling into heavy residue, and provide a framework for managing the financial risks of this transition. It’s time to turn that daunting wall of green into a perfect seedbed, without a drop of glyphosate.
In this detailed guide, we will cover the essential strategies and mechanical principles for successfully terminating cover crops in difficult conditions. The following sections break down everything from the science of roller-crimping to the economics of surviving the transition to a no-till system.
Summary: How to Terminate Cover Crops Without Glyphosate in Wet Springs?
- Why Roller Crimping Only Works at Anthesis (Flowering)?
- How to Use Sheep to terminate Covers Effectively Before Spring Drilling?
- Phacelia or Mustard: Which Cover Crop Winter-Kills Reliably in the UK?
- The Aphid Risk of Keeping Living Covers Too Close to Drilling
- How to Drill into High Biomass Residue Without Hairpinning?
- How to Break Plough Pans Using Roots Instead of Subsoilers on Heavy Clay?
- How Buckwheat Root Exudates Solubilize Phosphate for the Next Crop?
- How to Survive the First 3 Years of No-Till Without Going Bankrupt?
Why Roller Crimping Only Works at Anthesis (Flowering)?
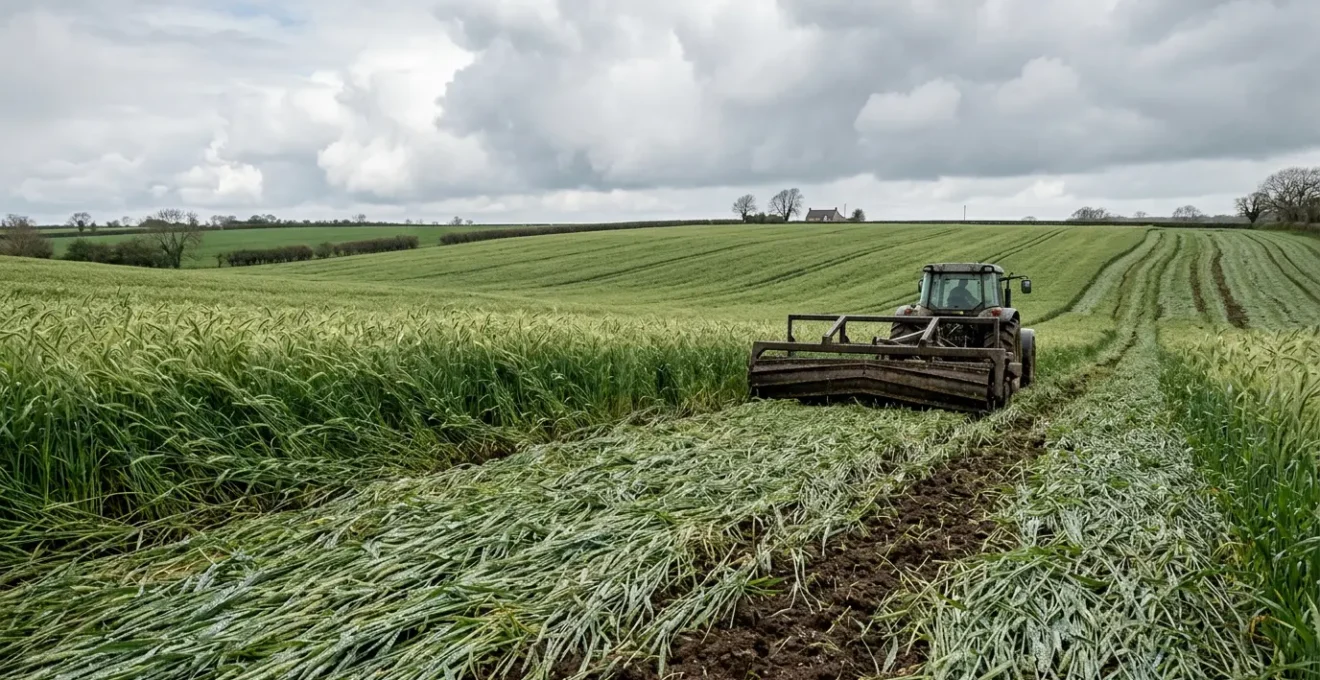
The roller-crimper is often presented as the flagship tool for organic no-till, but its effectiveness is entirely dependent on one critical biological window: anthesis, or the flowering stage. Attempting to crimp a cover crop like cereal rye before it reaches this stage is a common and costly mistake. In its vegetative state, the plant’s cells are turgid and flexible; rolling over them merely flattens them, and they will spring back up within days, more determined than ever. Termination is not achieved by weight, but by a specific mechanical injury.
At anthesis, the plant undergoes a fundamental physiological shift. It has transitioned its energy from vegetative growth to reproduction, and the lignin content in its stems is at its peak, making them hollow and brittle. This is the moment of vulnerability. The chevron-patterned blades of the roller-crimper are designed to kink the stem in multiple places, crimping the vascular tissue (xylem and phloem) and cutting off the flow of water and nutrients. This action, not crushing, is what kills the plant. The visual cue is unmistakable: cereal rye will be shedding its yellow pollen, as seen in the image below.
Furthermore, success requires a critical mass of biomass to form a dense, light-blocking mat that provides season-long weed suppression. Research consistently shows that a minimum of 5,000-8,000 pounds per acre of biomass is required at the point of crimping. Attempting to terminate a thin or patchy stand, even at perfect anthesis, will fail to create this weed-suppressing mulch layer, leaving the cash crop vulnerable to competition. Therefore, roller-crimping is a high-stakes technique that demands patience and a keen eye for the plant’s precise growth stage.
How to Use Sheep to Terminate Covers Effectively Before Spring Drilling?
Using livestock, particularly sheep, to terminate cover crops is an elegant solution that closes nutrient cycles and adds another enterprise to the farm. However, success hinges on moving away from gentle, set-stocking towards a high-intensity, short-duration approach often called “flash grazing” or mob grazing. The goal is not just to eat the cover crop, but to trample it into a mulch layer that primes the soil for drilling. This requires a much higher stocking density than conventional grazing.
The principle is to concentrate a large number of animals on a small area for a very short period (typically 24-48 hours). This intensity forces the sheep to be non-selective; they will eat or trample everything available, ensuring a complete and uniform termination. The hoof action also plays a crucial role, creating surface disturbance that helps incorporate the residue into the top layer of soil, accelerating decomposition. The key is to remove the animals quickly, before they begin to cause compaction and poaching, which is an especially high risk on the wet soils common in spring.
Monitoring soil conditions is paramount. If the ground is saturated, it’s better to delay grazing or use a different termination method entirely. The damage from compaction can negate many of the soil health benefits the cover crop provided. A well-managed flash-grazing system leaves behind a carpet of shredded organic matter, rich in manure and urine, creating a nutrient-dense and biologically active seedbed for the following cash crop.
Action Plan: High-Density Flash Grazing for Cover Crop Termination
- Set up temporary electrical fences charged between 3,500-6,000 volts around designated termination plots.
- Stock plots with a high density (e.g., 6-11 sheep per small plot, scaled up) to encourage trampling and non-selective grazing.
- Allow sheep to graze until the cover crop is over 90% removed or trampled, typically within a 24-48 hour window.
- Provide constant access to fresh water via large troughs to support the animals during the intensive grazing period.
- Avoid grazing on saturated soils at all costs to prevent severe poaching and compaction damage.
- Remove the livestock promptly once the termination target is met to allow the residue to begin breaking down.
Phacelia or Mustard: Which Cover Crop Winter-Kills Reliably in the UK?
For farmers seeking a lower-management termination strategy, selecting a cover crop species that reliably winter-kills is an attractive option. This approach eliminates the need for a spring mechanical or chemical pass, as frost does the termination work for you. However, with increasingly mild and wet UK winters, reliability has become a major concern. Species like Phacelia and white mustard, once considered dependable choices, now often survive, creating a “green bridge” for pests and becoming a weed problem themselves.
Phacelia, while excellent for soil structure and pollinators, is vulnerable to wet conditions. It winter-kills at around -8°C (18°F), but its real weakness is waterlogging. In a wet winter, anaerobic soil conditions can kill it even in the absence of a hard frost. Conversely, in a mild, dry winter, it may easily survive. Mustard is similarly frost-tolerant and can persist through mild UK winters, making its termination inconsistent. This unpredictability is a significant risk when planning for spring drilling.
For greater reliability in a modern UK climate, farmers should look towards species with less frost tolerance. The following table, based on an analysis from the Royal Horticultural Society and other agronomic data, shows more dependable options. Oilseed Radish and, particularly, Spring Oats offer a much higher chance of a complete winter-kill, providing a clean, friable seedbed in spring with minimal intervention.
| Cover Crop Species | Winter-Kill Temperature | UK Winter Survival | Wet Soil Vulnerability | Biomass at Termination |
|---|---|---|---|---|
| Phacelia (Phacelia tanacetifolia) | 18°F (-8°C) | May overwinter in mild areas; unreliable in wet winters | High – anaerobic conditions accelerate winter-kill | Comparable to cereal rye when established |
| Mustard (Sinapis alba) | Variable; moderately frost-tolerant | Can survive mild UK winters; inconsistent termination | Moderate – less vulnerable than Phacelia to waterlogging | Rapid biomass production but inconsistent termination |
| Oilseed Radish | 15-20°F (-9 to -7°C) | Reliable winter-kill in central UK | Very high – saturated soils promote complete kill | High biomass with reliable termination |
| Spring Oats | 20-25°F (-6 to -4°C) | Highly reliable winter-kill | High – wet conditions enhance winter-kill | Moderate to high biomass with guaranteed termination |
The Aphid Risk of Keeping Living Covers Too Close to Drilling
One of the most significant agronomic risks of transitioning away from burndown herbicides is managing the “green bridge.” This term refers to the living plant material that can host pests and diseases, allowing them to transfer directly from the dying cover crop to the newly emerging cash crop. The primary threat in many cropping systems is the aphid, which can transmit devastating viruses like Barley Yellow Dwarf Virus (BYDV).
When a cover crop is terminated mechanically or grazed, it doesn’t die instantly. There is a period where the decaying foliage can still support an aphid population. If the cash crop is drilled too soon after termination, these aphids simply move from their dying home onto the fresh, vulnerable seedlings. This creates a high-pressure infection scenario that can severely impact yield. To break this cycle, creating a sufficient time gap between termination and drilling is non-negotiable. Agronomic research from ADAS entomologists shows that a gap of 4-6 weeks between termination and drilling is necessary to ensure aphids die out before the new crop emerges.
However, the relationship between cover crops and insects is not entirely negative. A diverse cover crop sward also provides a habitat for a host of beneficial predatory insects, such as ladybugs, lacewings, and hoverflies, which are natural enemies of aphids. This creates a more balanced agroecosystem. As a research team noted in a Pest Management Science journal study, the effects can be species-specific. They state:
Rye weakly affected arthropods, with no impacts on cucumber beetles or natural enemies and marginally positive and negative effects on spider mites and melon aphids, respectively.
– Research team led by Mateos-Fierro, Pest Management Science journal study on cereal rye and aphid populations
The goal is to leverage these benefits while mitigating the green bridge risk. This means selecting cover crop species that are less hospitable to pests and, most importantly, adhering strictly to the termination-to-drilling time gap.
How to Drill into High Biomass Residue Without Hairpinning?
Drilling a cash crop into a thick, wet mat of terminated cover crop residue is one of the biggest mechanical hurdles in organic no-till. The primary failure point is “hairpinning,” which occurs when the planter’s disc openers fail to slice cleanly through the residue. Instead of cutting it, they push the tough, fibrous material down into the seed furrow, wrapping it around the seed. This creates a disastrous environment for germination: the residue wicks moisture away from the seed, prevents good seed-to-soil contact, and can even physically block the seedling’s emergence.
Preventing hairpinning is entirely a matter of equipment setup and aggression. Standard planter configurations are not designed for these high-stress conditions. Success requires a systematic approach to ensuring the planter can cut, clear, and close effectively. This often involves significant upgrades and diligent maintenance, especially keeping disc openers razor-sharp. Even small adjustments to down-pressure or planting speed can have a dramatic impact on performance in wet, tough residue.
Case Study: The ‘Planting Green’ Technique
A counter-intuitive but highly effective strategy to eliminate hairpinning is the ‘planting green’ method. This practice involves drilling the cash crop directly into the living cover crop, which is then terminated by a roller-crimper either mounted on the tractor’s front linkage or in a separate pass immediately after planting. Because the cover crop is still standing and anchored by its roots, the planter’s discs can slice through the green stems much more easily than through a loose, wet mat of residue. This completely prevents residue from being pushed into the furrow. While it requires careful management of competition and nutrient tie-up, it is a powerful tool for ensuring excellent seed placement in high-biomass systems.
For those drilling into terminated residue, a specific equipment configuration is essential for a clean cut. The following points are a baseline for setting up a planter to handle high-residue conditions effectively.
- Sharpen or replace disc opener blades: This is the most critical factor. Sharp, high-quality single-disc openers are designed to slice, not push.
- Increase down-pressure: Applying 200-250 pounds of pressure per row unit is often necessary to force the blades to cut through the thick mat.
- Install aggressive row cleaners: Spiked or toothed row cleaners mounted ahead of the openers are vital for physically moving heavy residue away from the furrow path.
- Upgrade to hydraulic downforce: For fields with variable residue, hydraulic systems provide consistent pressure that spring-based systems cannot match.
- Adjust planting speed: A slightly higher speed (4.5-5.5 mph) can create a shearing action that helps discs slice through tough, wet material.
- Use spiked closing wheels: These wheels help crumble the furrow wall and prevent surface residue from being pressed back into the closed furrow.
How to Break Plough Pans Using Roots Instead of Subsoilers on Heavy Clay?
Years of conventional tillage, especially ploughing in wet conditions, can create a dense, compacted layer known as a plough pan just below the depth of cultivation. This impermeable layer restricts water infiltration, suffocates soil biology, and physically blocks cash crop roots from accessing deeper moisture and nutrients. The conventional fix is a subsoiler—an expensive, diesel-hungry implement that violently shatters the soil. A regenerative approach, however, aims to use biology to do the same work more gently and sustainably through “bio-drilling.”
The principle of bio-drilling is to use specific cover crop species with powerful, deep-rooting capabilities to penetrate and break up the compacted pan. Species like tillage radish, with its thick, aggressive taproot, are exceptional at this. As the radish grows, its root acts like a biological drill bit, forcing its way through the dense layer. When the radish winter-kills, the large root decomposes in situ, leaving behind a deep, open channel. These channels become superhighways for air, water, and the roots of the following cash crop, effectively re-plumbing the soil profile without a single pass of steel.
However, for this biological system to work, it must be managed for maximum root growth and biomass. A weak, struggling cover crop will have shallow roots that never reach the plough pan. As Dr. Erin Silva of the University of Wisconsin-Madison emphasizes in her research, high biomass is not optional:
Cover crops must be managed for high biomass production for this system to be successful — at least 8,000 lb/ac of dry matter, or about 4 to 5 feet of height.
– Dr. Erin Silva, University of Wisconsin-Madison organic cover crop research
This level of growth is critical. The massive root system required to produce this much top-growth is what provides the power to fracture compaction. An Iowa study demonstrated a 5x biomass increase from May 5 to May 30, highlighting how crucial it is to let the cover crop reach its full potential to do the heavy lifting of soil remediation.
How Buckwheat Root Exudates Solubilize Phosphate for the Next Crop?
Phosphorus (P) is an essential nutrient for plant growth, yet it is often one of the most limiting factors in agricultural soils. A significant portion of soil phosphorus is locked up in mineral or organic forms that are unavailable for plant uptake. Buckwheat, a fast-growing broadleaf cover crop, possesses a remarkable biochemical ability to unlock this legacy P, making it available for the next cash crop. This process is driven by the unique root exudates it releases into the rhizosphere (the soil zone immediately surrounding the roots).
Buckwheat roots secrete mild organic acids, primarily citric and oxalic acid. These acids create a localized drop in soil pH around the root hairs. This change in acidity works like a chemical key, dissolving the bonds that tie phosphorus to minerals like calcium, iron, and aluminum. For instance, in high-pH calcareous soils, phosphorus is often locked up as insoluble calcium phosphate. The acids released by buckwheat roots can chelate the calcium, breaking the calcium-phosphate bond and releasing a soluble phosphate ion (H₂PO₄⁻) that the plant—and subsequent crops—can readily absorb.
This process of phosphate solubilization is a powerful tool in a low-input regenerative system, effectively mining the soil’s own nutrient bank rather than relying on expensive synthetic fertilizers. By cycling this newly available P into its own biomass, the buckwheat acts as a biological accumulator. When the buckwheat is terminated, this P is released back into the soil in a highly available organic form as the residue decomposes. Beyond its chemical prowess, buckwheat is also an excellent pollinator plant. Research on cover crop ecosystem services shows that Phacelia is listed among top 20 honey-producing flowers, and buckwheat provides a similarly valuable nectar source, supporting farm biodiversity while fertilizing the soil.
Key Takeaways
- Success in no-till termination is a system of details, not a single tool. It requires mastering timing, biomass, and equipment.
- The financial risks of the first few years are real. Start small on your best fields and have a contingency plan for failed termination.
- Leverage biology to do the work: use deep-rooted covers to break compaction and species like buckwheat to unlock soil nutrients, reducing long-term costs.
How to Survive the First 3 Years of No-Till Without Going Bankrupt?
The transition to a glyphosate-free, no-till system is a marathon, not a sprint. The first three years are often referred to as the “transitional trough,” a period where the risks are highest and the financial rewards may not yet be apparent. Weed pressure can increase before the system finds a new equilibrium, termination failures can lead to costly replanting, and there is a steep learning curve in managing new equipment and timings. Surviving this period requires a strategic mindset focused on risk mitigation, incremental learning, and financial prudence.
The single most important strategy is to start small. Resist the temptation to convert the entire farm at once. Designate 10-20% of your acreage, preferably on your best-drained fields with the lowest weed pressure, as a “learning lab.” This minimizes the financial fallout from inevitable mistakes. Document everything meticulously—what worked, what failed, and why. This field-specific data is infinitely more valuable than any generic advice. It’s also crucial to set realistic expectations: a perfect outcome might happen one in five times initially, while an acceptable, commercially viable result is a more reasonable goal for the majority of attempts.
From an economic standpoint, the long-term savings are significant. An economic analysis reveals that $8-12 per acre rolling costs versus $25-45 per acre herbicide costs can lead to equipment paying for itself in just one or two seasons. To bridge the initial gap, explore all available financial support. Government conservation programs (like EQIP in the US or similar environmental schemes in the UK) can provide cost-share for cover crop seed and new equipment. Furthermore, emerging markets for carbon credits and premium pricing for regeneratively grown products can create new revenue streams that help de-risk the transition.
Your Action Plan: Auditing Your No-Till Transition
- Risk Assessment: Identify your highest-risk fields (poor drainage, high weed pressure) and designate your most resilient fields as the initial ‘learning lab’ for the transition.
- Equipment Audit: Inventory your current planter setup. Assess disc opener sharpness, downforce capabilities, and the need for upgrades like aggressive row cleaners or spiked closing wheels.
- Biomass Plan: Define a clear target for weed-suppressing biomass (e.g., over 8,000 lbs/acre) and select a cover crop mix and management plan to reliably achieve it.
- Termination Calendar: Create a detailed schedule with target dates for termination based on cover crop anthesis and a strict, non-negotiable 4-6 week ‘green bridge’ gap before drilling.
- Contingency Budget: Allocate funds for a ‘Plan B’ in case of termination failure, such as using an approved organic herbicide (e.g., pelargonic acid) or a necessary mechanical pass.
By adopting an incremental approach, leveraging financial programs, and focusing on meticulous documentation, you can navigate the transitional trough and build a resilient, profitable, and truly regenerative farming system.