Surviving the no-till transition isn’t about patience; it’s about actively managing the biological and financial shocks to your farm system.
- The infamous “yield dip” is not inevitable but a direct result of unprepared soil and underfed soil biology.
- You must strategically increase inputs like Nitrogen at the start to build a “biological bridge” for your soil life.
Recommendation: Before you change a single practice, conduct a thorough soil compaction audit. Starting no-till on compacted ground is the single fastest way to financial failure.
I’ve been a no-till farmer for over two decades, and I’ve seen good farmers go broke chasing this dream. They’re told to “be patient” and “trust the process,” but patience doesn’t pay the bills when yields drop 20% and slugs are marching through your wheat. The conventional wisdom focuses on the long-term benefits—fuel savings, improved soil structure, better water infiltration—but it dangerously ignores the brutal, cash-flow-crushing reality of the first 36 months. This is where farms fail. It’s a period many call the “yield dip,” but I call it the great filter.
The common advice to simply use cover crops or “manage residue” is vague and unhelpful. It misses the fundamental point. Transitioning to no-till is not a passive act of just parking the plough. It is an active, intensive, and strategic intervention. You are fundamentally changing the metabolism of your farm, and you cannot expect it to perform without the right support. Forget the generic advice. The key to survival is not just waiting for biology to catch up; it’s about building a financial and biological bridge to get you through the transition phase without sacrificing your business.
This guide is built on the hard lessons learned from my own farm and from helping countless others navigate this journey. We will break down the specific, actionable steps you must take to manage the shocks to your system, from feeding your hungry soil microbes to making the critical machinery choices. We’ll confront the mistakes that lead to bankruptcy and outline the mindset required to see it through. This isn’t about blind faith; it’s about smart, defensive farming.
This article provides a roadmap based on years of experience. Follow along to understand the critical interventions needed to make your no-till transition a success story, not a cautionary tale.
Contents: A Mentor’s Guide to the No-Till Transition
- Why You Must Increase Nitrogen Rates During the Early No-Till Years?
- How to Control Slugs in High-Residue Systems Without Pellets?
- Disc or Tine Drill: Which Handles Wet Trash Better in UK Autumns?
- The Mistake of Starting No-Till on Compacted Soil Without Remediation
- When to Sell the Plough: The Psychological Moment to Commit Fully
- The Yield Dip Mistake That Bankrupts Farms in the First 3 Years of Transition
- Why Bacteria and Fungi Are the Engine of Nutrient Cycling?
- How to Replace Lost BPS Income via Agroecology on a 200-Hectare Farm?
Why You Must Increase Nitrogen Rates During the Early No-Till Years?
This feels wrong, I know. You’re moving to a more “ecological” system, and the first piece of advice is to use more synthetic nitrogen. It’s one of the most common mental hurdles for new no-tillers, but it’s absolutely critical for survival. Your soil, after years of tillage, has a biology that is bacteria-dominant and accustomed to having its food (residue) mixed in with plenty of oxygen. When you stop tilling, you leave a thick mat of high-carbon residue on the surface. The existing soil biology goes into a feeding frenzy to break down this carbon, but they need nitrogen to do it. This process, called immobilisation, effectively “steals” nitrogen from your growing cash crop.
This “carbon penalty” is a primary cause of the pale, hungry-looking crops you see in the first couple of years. You are not just feeding the crop; you are feeding the entire system and building the foundation for future nutrient cycling. Failing to account for this initial hunger is a recipe for a severe yield dip. Think of it as a one-time investment to kickstart your new biological engine. Some research from Louisiana State University recommends up to 20% more nitrogen during this transitional phase to satisfy both the soil microbes and the crop.
This isn’t a permanent strategy. As your fungal networks establish and nutrient cycling becomes more efficient over years three to five, you can and should begin to dial these rates back. But in the beginning, being stingy with nitrogen is a false economy that will cost you dearly in yield and stress.
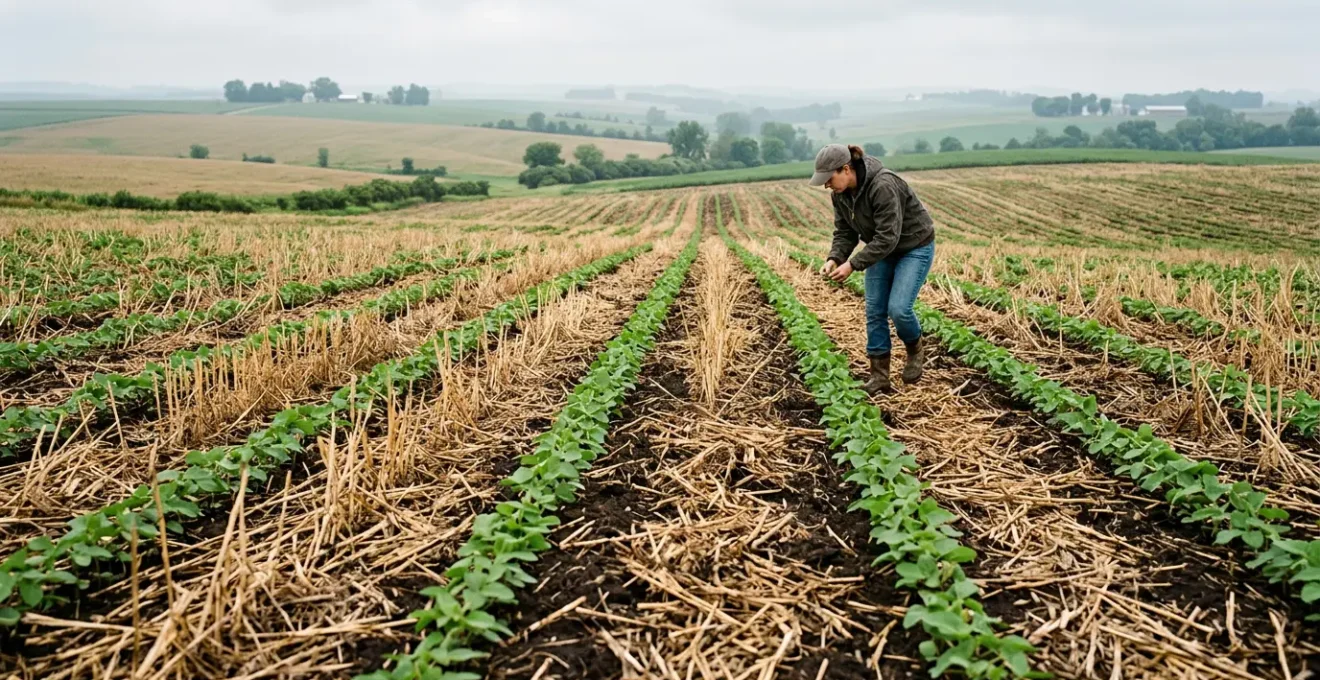
How to Control Slugs in High-Residue Systems Without Pellets?
If there’s one pest that loves a new no-till system, it’s the slug. The thick, damp layer of crop residue you’re carefully leaving on the surface is a five-star hotel for them: it provides food, moisture, and protection from predators and the sun. The temptation is to reach for the slug pellets, but this creates a costly chemical dependency and harms the very predators you need to encourage. A successful no-tiller thinks like a predator, not a poisoner. Your goal is to make the slug’s life difficult and a predator’s life easy.
First, you need to create a favorable environment for slug predators. Ground beetles (carabids), rove beetles, and even certain spiders are voracious slug-egg and juvenile slug hunters. By eliminating insecticides and providing a permanent habitat (your surface residue), you are building an army that works for you 24/7. It takes time, but this biological control is the cornerstone of a resilient system.
Second, you can make targeted cultural interventions. Using row cleaners on your drill to move residue away from the seed row creates a cleaner, warmer, and drier micro-environment that is less inviting for slugs. In fact, studies have shown that cleaning residue from the seed zone increases soil temperature by 1.5 to 3°C, which can also promote faster crop emergence, helping the plant outgrow the vulnerable stage. A slightly higher seed rate can also be a cheap insurance policy, ensuring you achieve your target plant stand even with some losses.
Disc or Tine Drill: Which Handles Wet Trash Better in UK Autumns?
The direct drill is the single most important—and expensive—piece of equipment in your transition. Making the wrong choice can lead to years of frustration, poor establishment, and financial pain. The central debate, especially in the challenging, wet conditions often found in UK autumns, revolves around tine drills versus disc drills. There is no single “best” answer; the right choice depends entirely on your soil type, rainfall, and residue levels. Anyone who tells you otherwise is selling something.
Tine drills are generally more forgiving in marginal conditions. They can handle wetter soils without causing the sidewall compaction or “smearing” that disc drills are prone to in sticky clays. They create more disturbance, which can be a disadvantage for soil health but a temporary advantage for mineralising a bit of nitrogen in the early years. However, their biggest drawback is their tendency to drag and bunch up heavy residue, a phenomenon known as “hairpinning,” which leads to poor seed-to-soil contact.
Disc drills are the purist’s choice for minimal disturbance. They slice cleanly through heavy cover crops and residue, placing seed with remarkable precision. But this precision comes at a cost. They require significant weight to penetrate hard ground and can struggle mightily when conditions get too wet, smearing the seed slot shut and creating a perfect anaerobic environment that kills seedlings. A detailed comparative analysis helps break down the specific trade-offs between these two systems.
| Characteristic | Tine Drill | Disc Drill |
|---|---|---|
| Wet/Clay Soil Performance | Superior – lower risk of sidewall smearing | Risk of compaction and hairpinning |
| Seed Depth Precision | Less precise, can vary across width | More precise with independent coulters |
| Heavy Residue/Cover Crops | Tends to bulldoze and drag material | Slices through cleanly |
| Soil Disturbance | Higher – even with minimal points | Lower – minimal disturbance |
| Initial Investment Cost | Lower cost, simpler design | Higher cost, more maintenance |
| Weight Requirement | Lighter – reduces compaction risk | Requires weight for penetration |
| Operational Window | Wider – works in challenging conditions | Narrower – struggles when too wet |
My advice? Don’t sell your old drill immediately. If possible, hire or demo both types on your own farm in your typical conditions before committing hundreds of thousands of pounds. This decision is too important to get wrong.
The Mistake of Starting No-Till on Compacted Soil Without Remediation
This is the cardinal sin of a no-till transition. If you do nothing else, hear this: do not start direct drilling on a field with existing compaction issues. You are setting yourself up for catastrophic failure. Tillage has been your get-out-of-jail-free card for years, masking compaction by temporarily shattering the soil. When you take that tool away, any underlying density, plough pans, or wheelings become a concrete barrier to root growth and water infiltration. Trying to establish a crop in this environment is like trying to plant in a car park.
You must treat compaction as a “debt” that has to be paid off before you can start earning the soil health dividend. The first step is diagnosis. Forget guesswork. Get a spade and a penetrometer and walk your fields. Dig holes, look for horizontal root growth, and feel the resistance. You need to know exactly where your compaction layers are and how deep they go.
The severity of this issue cannot be overstated. As the University of Minnesota Extension highlights in their guidance, the problem often lies far deeper than you think. They state:
Compaction caused by heavy axle loads (greater than 10 tons per axle) on a moist soil can extend to depths of two feet or more. Since this is well below the depth of normal tillage, the compaction is more likely to persist.
– University of Minnesota Extension, Soil Compaction Management Guide
If you find significant compaction, you must perform a one-time “reset.” This might mean a final pass with a low-disturbance subsoiler or deep-rooting cover crops like tillage radish or chicory for a full season. This is your last chance to fix structural problems mechanically. Once you commit to no-till, your only tools are roots and time. The financial impact is real; international research on compacted soil with tillage showed approximately 15% average first-year yield loss, a figure that would be far worse without the benefit of tillage.
Your Pre-Transition Soil Health Audit
- Visual Inspection: Dig inspection pits in multiple locations after rainfall. Look for standing water, sharp horizontal layers, and restricted root growth.
- Penetrometer Test: Systematically test fields to map the depth and severity of compaction layers. Note the PSI required to penetrate different depths.
- Earthworm Count: Dig a 20x20x20cm cube of soil. Count the number of earthworms. Fewer than 5 indicates poor biological activity, often linked to compaction or chemical use.
- Infiltration Test: Use a simple ring infiltrometer (or a piece of 6-inch pipe). Time how long it takes for one inch of water to soak into the soil. Anything over 30 minutes signals a problem.
- Remediation Plan: Based on the audit, decide if a final mechanical remediation is needed or if a biological approach with deep-rooting cover crops is sufficient before starting no-till.
When to Sell the Plough: The Psychological Moment to Commit Fully
This is a question I get asked all the time, and my answer surprises people. It’s not a date on a calendar. The right time to sell the plough isn’t year one, two, or even three. The right time is a psychological and strategic milestone: it’s the moment you stop seeing it as your safety net. As long as that plough sits in the corner of the shed, it represents a way out. In a tough, wet autumn when your new drill is struggling and the neighbour is flying along with his plough, the temptation to go back to what you know can be overwhelming.
Keeping the plough is a sign that you haven’t fully committed to solving problems within the no-till system. Instead of figuring out *why* your drill isn’t working—is it too wet? Is the residue too thick? Is my setup wrong?—your brain will default to the easy answer: “I’ll just plough it.” This prevents you from developing the high-level management skills that true no-till requires. You must force yourself to innovate instead of retreat.
The moment to sell the plough is when you’ve had a difficult season and successfully navigated it *without* using it. It’s when you’ve managed to establish a good crop in less-than-ideal conditions by adjusting your drill, waiting for a better window, or managing residue differently. It’s when your first thought during a challenge is “How do I solve this within my system?” rather than “How do I get out of this system?” When you reach that point, the plough is no longer a tool; it’s a liability. Selling it is not just a financial transaction; it’s a declaration that you are a no-till farmer, period. It draws a line in the sand and forces you to move forward.
The Yield Dip Mistake That Bankrupts Farms in the First 3 Years of Transition
Let’s be blunt. The “yield dip” isn’t some mysterious force of nature. It’s the cumulative financial result of a series of predictable, avoidable mistakes. Farms don’t go bankrupt because no-till doesn’t work; they go bankrupt because they are unprepared for the transition’s initial demands. The number one mistake is viewing the transition as a cost-saving exercise from day one. You’ve heard the promises of lower fuel and labour costs, and they are real, but they come later. In years one to three, you must be prepared to invest, not just save.
The bankruptcy recipe is simple: a farmer starts with compacted soils (Mistake #1), which restricts root growth. They don’t increase their nitrogen rate (Mistake #2), so the crop is starved by the carbon penalty. They get overwhelmed by slugs and weeds because they haven’t built up a population of beneficial insects (Mistake #3). And they bought the wrong drill for their conditions (Mistake #4), resulting in poor establishment. Each of these issues alone might cause a 5-10% yield hit. Combined, they create a perfect storm that can easily slash yields by 30% or more, while costs for inputs like extra seed and N have actually increased. This is the financial vice that crushes farms.
Surviving means creating financial shock absorbers. You need to budget for higher N rates for at least two years. You must have the capital for the correct drill. You may need to invest in a one-time soil remediation pass. This is not a time for cutting corners. You must approach the first three years with a defensive financial plan that anticipates higher-than-normal costs and potentially lower-than-average yields. The farmers who succeed are the ones who plan for the worst-case scenario and are pleasantly surprised when it’s better than expected. The ones who fail plan for the best and are wiped out by reality.
Why Bacteria and Fungi Are the Engine of Nutrient Cycling?
To be a successful no-tiller, you have to become a microbe farmer first. Understanding the difference between a bacterially dominated soil and a fungally dominated soil is the key to everything we’re trying to achieve. For decades, tillage has created a soil environment that favors bacteria. Tillage injects oxygen, shreds crop residues into small pieces, and breaks up fungal networks. Bacteria thrive in this disturbed environment. They are the fast-living, rapidly reproducing sprinters of the soil world. They quickly break down simple organic matter, but in doing so, they release a lot of carbon into the atmosphere and are less efficient at building stable soil structure.
When you stop tilling, you are trying to shift the balance of power to the fungi, specifically mycorrhizal fungi. Fungi are the marathon runners. They build complex, extensive networks of hyphae that are the superhighways of the soil. These networks are physically destroyed by tillage. In a no-till system, these hyphae can grow uninterrupted, binding soil particles together to create the stable aggregates that improve water infiltration and prevent erosion. They are master scavengers, extending far beyond the reach of a plant’s roots to find and transport nutrients like phosphorus and water back to the plant in exchange for carbon (sugars) from the plant’s photosynthesis.
This shift from a bacterial to a fungal system is the “biological bridge” we’ve been talking about. It doesn’t happen overnight. It’s why you need to “feed the bridge” with nitrogen at the start and protect it from insecticides. Bacteria provide a quick but leaky nutrient cycle. Fungi provide a slower, more stable, and far more efficient cycle that builds soil wealth over time. Your job as a transition farmer is to do everything you can to foster this fungal revolution beneath your feet.
Key Takeaways
- The no-till “yield dip” is not inevitable; it’s a direct consequence of unprepared soil and poor management during the first few years.
- Start by fixing existing problems. Do not begin direct drilling on compacted soil; perform a “systems reset” with mechanical or biological remediation first.
- You must budget to actively feed your soil biology at the start. This means temporarily increasing Nitrogen rates to overcome the carbon penalty from surface residue.
How to Replace Lost BPS Income via Agroecology on a 200-Hectare Farm?
The elephant in the room for many farmers in the UK and Europe is the phasing out of the Basic Payment Scheme (BPS). How can you afford to take a potential yield hit during the transition when a huge chunk of your guaranteed income is disappearing? The answer is you can’t. The goal of a successful no-till system isn’t just to survive without subsidies; it’s to build a business that is so resilient and profitable that subsidies become irrelevant. This is where agroecology moves from a buzzword to a core business strategy.
On a 200-hectare farm, this means thinking beyond the simple wheat-oilseed rape rotation. A mature no-till system opens up doors to new income streams that were difficult in a tillage-based model. The first and most obvious is the integration of livestock. Improved soil structure means your fields can carry livestock for longer periods without damage. Grazing diverse cover crop mixes not only feeds the animals for free but also turbo-charges your soil biology with manure and urine, accelerating the journey to healthy soil. This creates a new enterprise (lamb, beef) from what was previously a cost (cover crop seed).
Second, diversify your cash crops. Introduce crops like linseeds, beans, or millet that have different rooting structures and attract a premium in certain markets. Your improved soil health and water-holding capacity make you more resilient to drought, allowing you to grow these crops more reliably. You can also explore premium markets for “regeneratively farmed” grains. As consumers become more aware, a verifiable story of soil health and carbon sequestration can add real value to your commodities. This is about stacking enterprises and creating multiple streams of income from the same land base, turning your farm from a fragile monoculture into a robust, interconnected ecosystem that generates its own fertility and financial resilience.
The journey is a marathon, not a sprint. By adopting this mindset of active, strategic management, you can build a farming system that is not only environmentally sound but also financially robust. Start today by auditing your soil and making a realistic plan for the next three years.