The persistent waterlogging on your clay fields, despite having drains, is not a drainage failure but a hydraulic connectivity failure at the soil surface.
- Surface compaction and soil aggregate collapse (slaking) create an impermeable layer that prevents water from ever reaching the drains.
- Mechanical interventions like mole ploughing and subsoiling are effective only when timed perfectly to the soil’s plastic limit, otherwise they can worsen compaction.
Recommendation: Shift your focus from simply removing water to systematically rebuilding the pathway for water from the surface to the drain, using a combination of targeted mechanical loosening and long-term biological soil structuring.
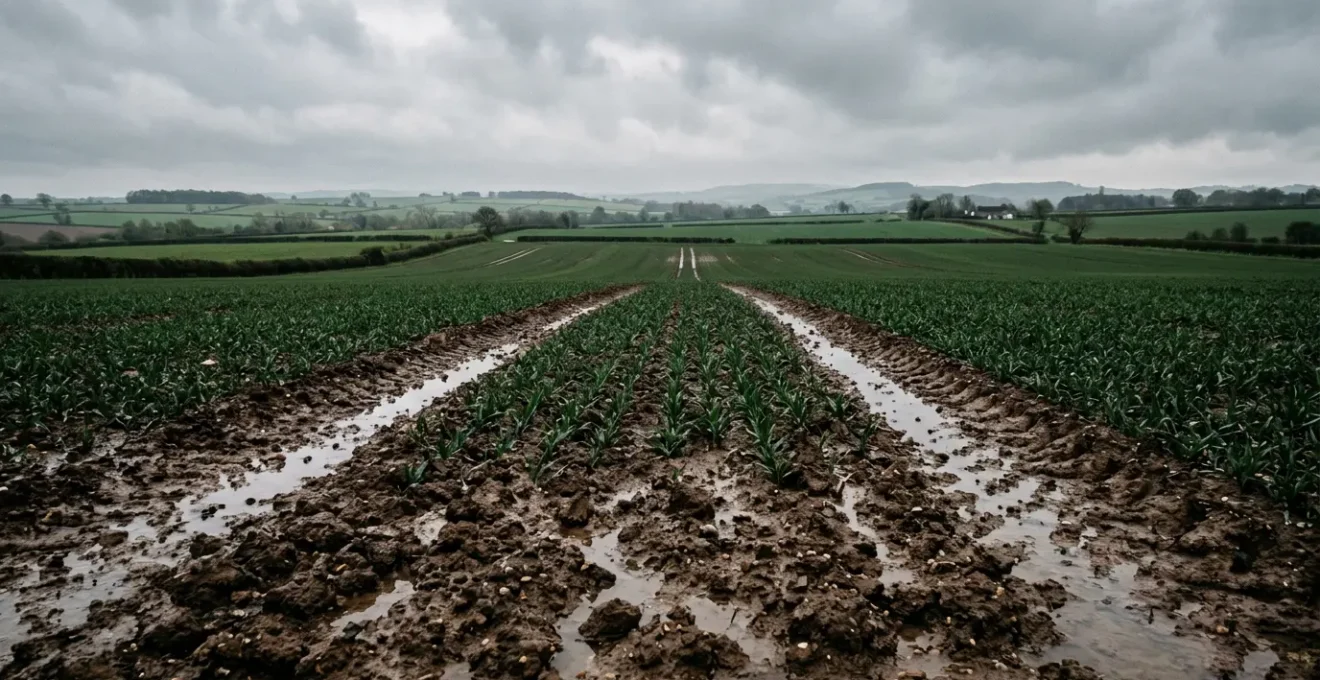
The frustration is palpable. Heavy rain falls, and once again, water stands in your fields for days, delaying planting and threatening crop health. You know there’s an expensive field drainage system buried beneath the mud, yet the pipes are likely running clear. This paradox is the central challenge of managing heavy clay soils. The common advice often involves aggressive, brute-force solutions like deep ripping or installing more drains, but these approaches frequently fail to address the root cause and can even exacerbate the problem if timed incorrectly.
The issue is rarely the drains themselves, but the broken link between the soil surface and the drainage system. Years of heavy machinery traffic, coupled with the inherent properties of clay and silt, create a dense, impermeable pan near the surface. This layer effectively seals the soil, preventing rainwater from infiltrating downwards. Water has nowhere to go but to pool on the surface or run off, taking valuable topsoil with it. The solution, therefore, is not about bigger drains but about smarter, more precise soil management.
This guide moves beyond generic advice to provide an engineer’s perspective on rebuilding your soil’s hydraulic resilience. The key is to understand that you are not just farming crops; you are engineering a complex hydrological system. We will explore the specific mechanisms of failure, such as slaking and deep compaction, and detail the technical requirements for effective interventions. Instead of fighting water, you will learn how to guide it, restoring the critical hydraulic connection that allows your fields to breathe and drain as they were designed to.
This article provides a structured approach to diagnosing and solving waterlogging issues. The following sections break down the specific problems and solutions, from understanding why your drains aren’t working to making strategic investments in water retention.
Summary: A Technical Manual for Restoring Farm Drainage on Clay Soils
- Why Your Drains Are Running Clear While Water Stands on the Surface?
- How to Mole Plough Effectively to Connect Surface Fissures to Drains?
- Subsoiling vs Cover Cropping: Which Solves Waterlogging Faster?
- The Slaking Risk on Silty Soils That Causes Runoff at 10mm of Rain
- When to Jet Your Drains: The Maintenance Schedule for 30-Year-Old Systems
- Why Slowing Water Flow Reduces Peak Flood Levels Downstream?
- The Tyre Pressure Error That Ruins Soil Structure for 5 Years
- Natural Water Retention Measures: Are Leaky Dams Worth the Investment?
Why Your Drains Are Running Clear While Water Stands on the Surface?
This common and frustrating scenario points to a critical failure in what engineers call hydraulic connectivity. Your drainage system is likely functioning perfectly, but it’s isolated from the surface water by an impermeable layer of compacted soil. This layer acts like a liner in a pond, preventing vertical water movement. The problem isn’t the drain; it’s the pathway to the drain that is broken. On heavy clay soils, even a thin layer of compaction or surface sealing can dramatically reduce the soil’s ability to absorb water, forcing it to stand on the surface or run off.
The physics behind this is stark. The rate at which water moves through soil is known as hydraulic conductivity. In well-structured soil, this rate is high. In compacted clay, it plummets. In fact, research demonstrates that hydraulic conductivity can be as low as 1.2 × 10⁻¹¹ m/s, a rate practically indistinguishable from solid rock. This is why you can have a high-capacity drainage system just a meter below the surface that remains completely dry while your crops are drowning. The water simply cannot get there.
Diagnosing this layer is the first step. It often exists in the top 15-30 cm, created by tillage practices or surface sealing from raindrop impact on bare soil. A simple spade test can often reveal it: dig a small pit and look for a dense, plate-like layer that is difficult to break through. Below this pan, the soil may be relatively dry and friable. This confirms that the issue is a barrier to infiltration, not a high water table. Until this restrictive layer is addressed, any other water management efforts will be ineffective.
How to Mole Plough Effectively to Connect Surface Fissures to Drains?
Mole ploughing is a powerful technique for creating artificial drainage channels, but its success is entirely dependent on timing and soil condition. Executed correctly, it creates a network of stable, unlined tunnels that act as secondary drains, connecting surface fissures directly to the gravel backfill over your primary drains. Executed poorly, it can smear the soil, seal the channel, and be a complete waste of fuel and time. The key engineering principle is the soil’s plastic limit—the specific moisture content where the soil can be deformed without cracking or smearing.
To achieve this, the soil at moling depth (typically 40-60 cm) must be moist and plastic enough to form a smooth, stable channel, while the soil above it should be dry and brittle enough to crack and fissure, creating pathways for water to enter the mole channel. This condition is usually met during a narrow window in late spring or early summer as the soil profile is drying out. Testing the soil is not optional; it’s a prerequisite. A simple field test involves rolling a small sample of soil from the target depth in your hand. If it forms a stable, pencil-thin thread without crumbling or smearing, conditions are likely ideal.
This image demonstrates the critical hands-on test farmers use to assess soil moisture before mole ploughing, ensuring the clay is at its plastic limit.
Modern best practices, refined from historical failures, provide clear guidelines. The
Case Study: Modernizing Mole Drainage in Victoria, Australia
Research in Victoria, Australia, addressed high failure rates of older mole drainage systems. Key findings determined that for a stable channel, the soil at moling depth must have a minimum of 45% clay content and be at its plastic limit. The research also stressed the importance of integrating mole channels with permeable backfill (gravel) that extends at least 150mm above the moling depth, ensuring a durable hydraulic connection to the primary drainage system.
When these conditions are met, properly installed mole drains can last beyond 5 years, though re-installation every 3-4 years is often recommended to maintain peak performance.
Subsoiling vs Cover Cropping: Which Solves Waterlogging Faster?
When faced with a compacted layer, the choice often boils down to a mechanical or a biological solution: subsoiling for an immediate fix or cover cropping for a long-term rebuild. The decision depends on your time horizon, budget, and soil management philosophy. Subsoiling, or deep ripping, is a fast, aggressive intervention. It physically shatters the compaction pan, creating immediate fissures for water and root penetration. The results can be dramatic and quick, with a four-year rotation study finding that subsoiling increased seed cotton yields to 2342 kg/ha compared to 2059 kg/ha in non-subsoiled plots.
However, this mechanical fracturing is a temporary solution. The soil’s structure has not been fundamentally improved, and without changes in management practices (like reducing axle loads), the soil is highly prone to re-compaction, often within a single season. It treats the symptom—the hardpan—but not the cause, which is poor aggregate stability.
Cover cropping represents the opposite approach. It is a slower, biological process that builds resilient, long-lasting soil structure from the inside out. Deep-rooting species like daikon radish, chicory, or specific clovers create “bio-channels” as their roots grow and decay. These channels, along with the increased organic matter from the cover crop biomass, improve soil aggregation, water-holding capacity, and infiltration rates. This process is not a quick fix; it can take several years to see significant changes in drainage performance. However, the structure it builds is far more resistant to future compaction. The choice is strategic: subsoiling is a reset button, while cover cropping is a system upgrade. For many, the ideal approach is a hybrid: using a one-time subsoiling operation to break the initial pan, followed by a consistent cover cropping program to build and maintain a new, resilient structure.
The Slaking Risk on Silty Soils That Causes Runoff at 10mm of Rain
While compaction is a major cause of poor infiltration, another, more subtle process is often at play, especially on soils with significant silt content: slaking. Slaking is the structural collapse of soil aggregates when they are rapidly wetted. Soils with low organic matter and poor structure are particularly vulnerable. When a heavy rain shower hits bare, dry soil, the aggregates can essentially dissolve into their constituent particles of sand, silt, and clay. The finer silt and clay particles then clog the soil pores at the surface, forming a thin, dense crust that is almost completely waterproof.
This crusting can happen incredibly quickly. On susceptible soils, as little as 10mm of intense rainfall can be enough to create a seal, leading to immediate surface ponding and runoff, even if the soil profile below is dry. This explains why fields can start to flood minutes into a downpour. The problem is not that the soil is full; it’s that the “door” has been slammed shut. The best defense against slaking is to improve soil aggregate stability, primarily through increasing soil organic matter, and to protect the soil surface from the direct impact of raindrops with crop residue or living cover.
This visual starkly contrasts a stable soil aggregate that holds its shape in water with an unstable one that has slaked and dispersed, clouding the water and indicating poor structure.
The susceptibility to slaking varies widely based on soil properties and land management. Detailed mapping research in mixed agricultural landscapes revealed that the slaking index, a measure of this vulnerability, can range from 0 (very stable) to 7.3 (highly unstable), with the highest risk found in soils with over 25% clay content and low organic carbon. This highlights that managing slaking risk requires a focus on building soil health, as a structurally sound soil can resist the destructive force of water.
When to Jet Your Drains: The Maintenance Schedule for 30-Year-Old Systems
Field drainage systems are not a “fit and forget” investment, especially after several decades of service. For 30-year-old systems, proactive maintenance is crucial to ensure they continue to function effectively. The primary threat to older drains is internal blockage from silt, clay particles, and, in some soil types, iron ochre—a slimy, orange deposit caused by iron-loving bacteria. High-pressure water jetting is the most effective method for clearing these blockages, but the question is when to do it.
Rather than a fixed schedule, a diagnostic approach is more cost-effective. The first step is regular inspection of your drainage outfalls, especially during and after heavy rainfall. Look for these key signs:
- Reduced Flow: If some outfalls are running at a trickle while others are gushing, it’s a clear sign of an upstream blockage.
- Silt Deposits: A fan of silt or sand accumulating at the outfall indicates that soil is entering the pipe, a precursor to a major blockage.
- Iron Ochre: The presence of orange slime or hard, rusty deposits at the outfall means you have an ochre problem, which can completely clog pipes if left untreated.
- Persistent Wet Spots: If you see wet areas in the field that mirror the known layout of your drains, it’s a strong indicator that a specific lateral is blocked.
Based on these diagnostics, a risk-based maintenance schedule can be developed. For a 30-year-old system in highly silty soils or with known ochre issues, a full jetting cycle every 5-7 years might be a necessary preventative measure. In more stable clay soils without significant silt infiltration, jetting may only be required on an as-needed basis, perhaps every 10-15 years, when inspections reveal a problem. Keeping detailed maps of your system and records of problem areas allows you to target jetting efforts where they are most needed, maximizing the return on your maintenance investment.
Why Slowing Water Flow Reduces Peak Flood Levels Downstream?
Effective on-farm water management has benefits that extend far beyond your own property lines. By increasing your soil’s capacity to absorb and hold water, you are actively participating in regional flood mitigation. The core principle is hydrograph attenuation: slowing the movement of water from the land into rivers and streams. When heavy rain falls on compacted, impermeable land, it runs off almost immediately, causing a rapid and high peak in river levels downstream, which can lead to flooding in towns and villages.
Conversely, when rain falls on healthy, well-structured soil, it acts like a sponge. Water infiltrates, is held in the soil profile, and is released slowly over days or weeks through field drains and natural seepage. This dramatically flattens the flood peak. The difference in water-holding capacity is enormous. For example, according to USDA-NRCS engineering data, bare, compacted soil may only hold 1.7 inches of water in the top foot, while the same soil with a continuous living cover and good structure can hold 4.2 inches. That’s a massive increase in buffer capacity across a whole farm.
This buffering effect is primarily driven by soil organic matter, which is built through practices like cover cropping, no-till, and manure application. As experts James J. Hoorman and Alan Sundermeier note in their research on soil and water quality:
Deep rooted cover crops increase subsoil water holding capacity. A pound of soil organic matter has the ability to absorb 18 to 20 pounds of water, which is beneficial in a dry year.
– James J. Hoorman and Alan Sundermeier, Using Cover Crops to Improve Soil and Water Quality
By managing your farm to be a more effective sponge, you not only improve your own soil’s resilience to both drought and waterlogging but also become a crucial part of the solution to wider catchment-scale flooding issues.
The Tyre Pressure Error That Ruins Soil Structure for 5 Years
One of the most damaging and least appreciated errors in modern farming is operating heavy machinery with overinflated tyres. While high pressure is necessary for road travel, it is catastrophic for soil structure. The damage extends far deeper than the plough layer and can persist for years. The critical concept to understand is the compaction bulb. A high axle load on a high-pressure tyre creates a bulb-shaped zone of intense compaction that can penetrate deep into the subsoil, well below the depth of conventional tillage.
This deep compaction is particularly insidious. While annual subsoiling might temporarily shatter a surface-level pan, it often fails to reach the bottom of this deep compaction bulb. Worse still, the soil’s natural tendency is to re-compact under its own weight and subsequent machine traffic. A five-year study in Alabama on sandy loam soils demonstrated this effect clearly. One year after a deep subsoiling operation, the soil strength had already returned to root-limiting levels. The research concluded that for these cropping systems, annual subsoiling became a necessary, and expensive, ongoing cost to combat re-compaction.
The damage from a single pass with a heavy, overinflated piece of equipment can therefore lock you into a cycle of costly remediation. The solution lies in prevention: managing axle loads and, most importantly, adjusting tyre pressures for field work. Modern IF (Increased Flexion) and VF (Very High Flexion) tyres are designed to operate at much lower pressures in the field, which spreads the machine’s weight over a larger footprint. This dramatically reduces the depth and intensity of the compaction bulb, protecting the subsoil from long-term structural damage. Ignoring tyre pressure is not a minor oversight; it’s an economic decision that can impose a multi-year penalty on your soil’s health and productivity.
Key Takeaways
- Waterlogging is a symptom of broken hydraulic connectivity, not just poor drainage.
- The timing of mechanical interventions like mole ploughing is critical and must be dictated by the soil’s plastic limit to be effective.
- Biological solutions like cover crops offer long-term resilience, while mechanical subsoiling provides a short-term reset.
Natural Water Retention Measures: Are Leaky Dams Worth the Investment?
Beyond in-field soil management, there is a growing interest in engineered Natural Water Retention Measures (NWRM), such as leaky dams, bunds, and retention ponds. These structures are designed to intercept and temporarily store surface runoff during storm events, releasing it slowly afterwards. From a catchment-scale perspective, they are highly effective at reducing downstream flood peaks. But for the individual farmer, the question is more direct: is dedicating productive land and capital to such a structure a worthwhile investment?
The answer requires a careful cost-benefit analysis that goes beyond simple flood control. A leaky dam, for example, can offer multiple co-benefits. It can significantly reduce gully erosion on downstream fields by slowing water velocity. The stored water can potentially be used as a source for livestock or for filling sprayers, reducing reliance on other sources. Furthermore, many regions offer significant grant funding and environmental stewardship payments for installing such features, which can heavily offset the initial construction costs.
However, the costs and liabilities must also be considered. There is the direct opportunity cost of the land taken out of production. There are ongoing maintenance obligations to ensure the structure remains safe and functional. Crucially, there are also legal responsibilities; you may need permits for construction and could be liable for downstream consequences if the structure were to fail. A thorough evaluation, therefore, treats the NWRM not as an environmental project, but as a capital investment in farm infrastructure.
Action Plan: Cost-Benefit Analysis for a Water Retention Structure
- Calculate Erosion Reduction Value: Estimate the value of topsoil saved and yield loss prevented on downstream fields.
- Research Grant Funding: Inventory all available local and national grant programs for water retention infrastructure to determine potential cost-share.
- Assess Multi-Use Potential: Quantify the value of the structure as a water source for livestock or spray applications.
- Calculate Opportunity Cost: Determine the net profit lost from the land area removed from crop production.
- Evaluate Legal & Permit Costs: Investigate permit requirements, engineering design costs, and potential legal liability for downstream effects.
By adopting this engineering mindset—diagnosing failures, applying precise solutions, and making strategic investments—you can transform your fields from waterlogged liabilities into resilient, productive assets. The first step is to create a detailed water management plan for your specific farm, starting today.