Your fields have taken a battering this winter, and the thought of expensive lab tests to figure out the damage is daunting; the truth is your best diagnostic tools are already in the farm workshop.
- Compaction and poor structure can be diagnosed in minutes with a spade and your hands by reading the soil’s physical language.
- Biological tools like cover crop roots and earthworms can repair soil structure more effectively and cheaply than steel implements.
Recommendation: Start reading the physical language of your soil today to build long-term hydraulic resilience and cut unnecessary intervention costs.
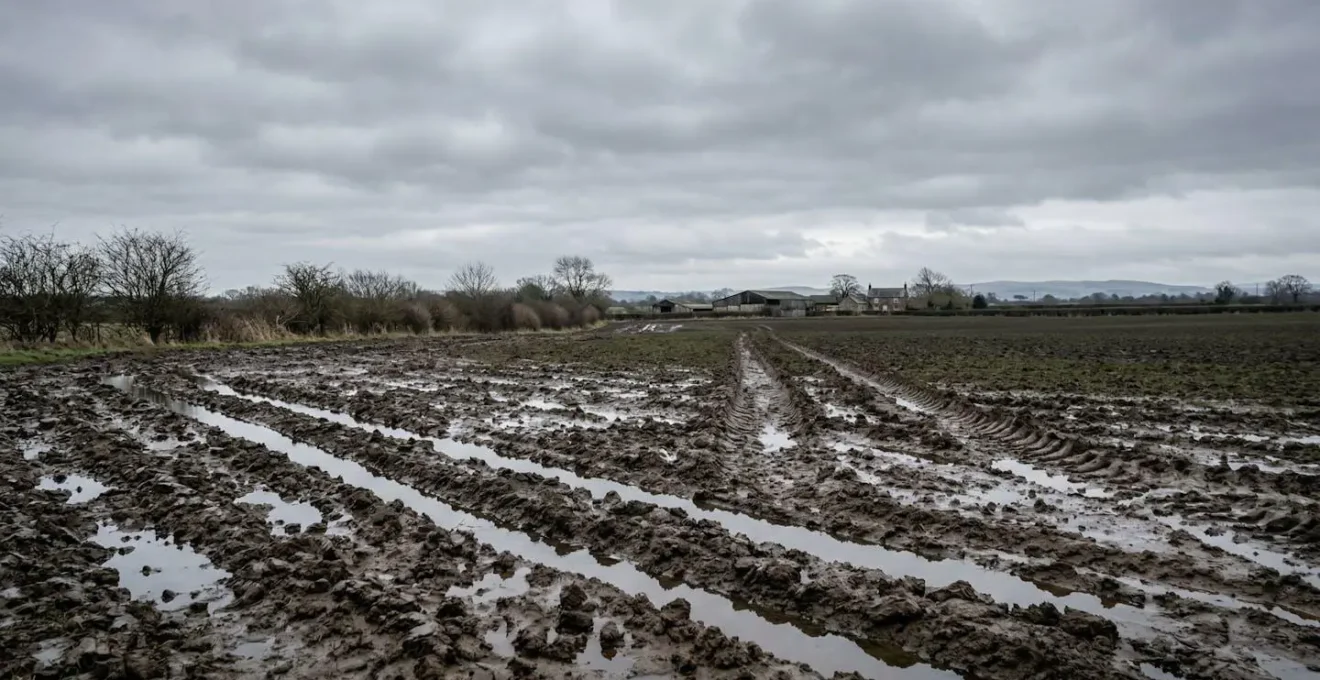
Another wet winter has passed, and if you’re farming in the Midlands, you’re likely looking out at fields that are holding water longer than you’d like. The gut reaction might be to call the agronomist, book the subsoiler, or send off soil samples for a costly lab analysis. These are the standard plays, the things we’re told to do. We’re told to measure N, P, and K, to get an organic matter percentage, and to throw steel at compaction problems. But what if the most important story your soil is telling isn’t written in a lab report?
What if the answers to poor drainage, compaction, and weak crop performance are written in the soil profile itself, visible to the naked eye? The real key to understanding and restoring your soil’s health lies not in complex chemical analysis, but in learning to read its physical language. It’s about trading the lab coat for a good pair of boots and a spade. This is about developing the skill to diagnose the health of your ground by its structure, its smell, its colour, and the life within it. It’s about using roots as ‘biological machinery’ to do the heavy lifting that steel often does badly.
This guide is designed to put the power of diagnosis back in your hands. We will walk through a series of simple, effective, field-based tests that require nothing more than a spade and your own observations. From identifying the exact depth of a compaction layer to deciding if the ground is fit to carry a tractor, you’ll learn how to make informed management decisions that save money, build soil structure, and create true hydraulic resilience for the seasons ahead.
The following sections provide a complete field guide to assessing and managing your soil’s physical health. Each part addresses a critical question you face on the farm, offering practical, low-cost solutions grounded in the principles of soil science and real-world application.
Summary: A Farmer’s Guide to Reading Soil Health
- The Spade Test: How to Spot Compaction Layers at 30cm Depth in 5 Minutes?
- How to Break Plough Pans Using Roots Instead of Subsoilers on Heavy Clay?
- VESS Scoring or Worm Counts: Which Metric Predicts Next Year’s Yield Better?
- The Tyre Pressure Error That Ruins Soil Structure for 5 Years
- When to Intervene Mechanics: The 3 Dry Days Rule You Must Follow
- Why Your Drains Are Running Clear While Water Stands on the Surface?
- Why Straw Incorporation Alone Won’t Build Stable Humus Rapidly?
- How to Improve Hydraulic Resilience on Clay Soils During Heavy Rainfall?
The Spade Test: How to Spot Compaction Layers at 30cm Depth in 5 Minutes?
Before you even think about subsoiling, you need to know if you have a compaction problem, where it is, and how severe it is. The spade test is the quickest and most effective diagnostic tool in your arsenal. Forget guesswork; in five minutes, you can create a clear blueprint of your soil’s structure. The key is to dig when the soil is moist but not saturated, typically a couple of days after significant rainfall. This allows the soil to reveal its true structure without smearing or being hard as rock.
When you put the spade in, use all your senses. Listen for a dull ‘thud’—that’s the sound of your spade hitting a dense plough pan. As you lift the block of soil out, look at the profile. Healthy soil is dark, crumbly, and smells earthy. Compacted layers often appear as horizontal plates, sometimes grey or mottled, and can give off a sour, rotten-egg smell which indicates anaerobic conditions (a lack of oxygen). This lack of oxygen is a killer for both root function and beneficial soil life. Finally, observe the root patterns. Are they growing straight down, or are they turning sideways in a distinct ‘J’ shape? Horizontal roots are a dead giveaway of a barrier they cannot penetrate.
This simple visual assessment, as demonstrated in initiatives like the AHDB Strategic Cereal Farm programme at Squab Hall, provides an immediate and actionable baseline. By using spade-based methods like the Visual Evaluation of Soil Structure (VESS), the farm established that fields with regular organic matter inputs had far superior structure and more of the deep-burrowing earthworms essential for drainage. This proves that simple, in-field observation can guide management far more effectively than a generic lab report.
- Step 1: Wait 2-3 days after rainfall when soil is moist but not saturated.
- Step 2: Dig a soil block roughly 20cm wide and to the full depth of your spade.
- Step 3: Listen for a ‘thud’ indicating a pan and look for grey, smelly, platy layers.
- Step 4: Break a clod by hand. If it crumbles into aggregates, structure is good; if it smears, it is poor.
- Step 5: Examine root patterns. Horizontal or J-shaped roots confirm a compaction layer is blocking growth.
How to Break Plough Pans Using Roots Instead of Subsoilers on Heavy Clay?
Once you’ve identified a plough pan with your spade, the conventional wisdom is to reach for the subsoiler. But this is an expensive, fuel-intensive process that can do more harm than good if done at the wrong time. A more elegant and sustainable solution is to employ ‘biological machinery’: deep-rooting cover crops. Plants like tillage radish, chicory, and sweetclover have powerful taproots that are evolved to punch through dense soil layers, creating natural, stable channels for air and water.
This isn’t just a theoretical idea; it’s a proven strategy. A four-year study at Ohio State University found that soybeans grown after cover crops yielded better than those following annual subsoiling, especially in a drought year. The deep taproots of the cover crops had penetrated the compaction, creating macropores that allowed the cash crop’s roots to access moisture deeper in the soil profile—a benefit the subsoiler couldn’t provide. This biological approach turns a problem into an opportunity, building long-term soil structure and fertility rather than just temporarily shattering a pan.
From an economic standpoint, the argument is just as compelling. While the upfront cost of cover crop seed needs to be factored in, it often becomes more profitable than mechanical intervention very quickly. An economic analysis from the Sustainable Agriculture Research and Education program shows that while subsoiling can cost over £12 per acre in fuel and labour, cover crops can break even by the second year through improved yields and reduced input costs, all while continuously improving the soil asset.
As the image above illustrates, the action of a single taproot creates a permanent pathway. Unlike a subsoiler leg which can smear wet clay, the root actively restructures the soil around it, encouraging aggregation and providing a food source for the worms and microbes that will maintain these channels long after the plant has died. This is how you build a soil that fixes itself.
VESS Scoring or Worm Counts: Which Metric Predicts Next Year’s Yield Better?
When you’re in the field with your spade, you have two primary biological indicators at your fingertips: the physical structure of the soil (which you can score using the VESS system) and the earthworm population. The question many farmers ask is, which one is more important? The answer is that you need both to get the full story. They don’t measure the same thing; they provide a crucial diagnostic sequence.
Think of it this way: VESS measures the quality of the ‘house’—the physical habitat. It tells you if the soil has good porosity, stable aggregates, and allows for root growth. A low score (1-2) means you have a good structure. A high score (4-5) indicates significant compaction or plating. Earthworm counts measure the ‘inhabitants’ of that house. A healthy worm population (especially the presence of large, deep-burrowing species) tells you the habitat is not only physically sound but also has enough food (organic matter) and oxygen, and a suitable pH to support life.
The real diagnostic power comes from combining the two metrics. For instance, if you have a poor VESS score and a low worm count, your primary problem is physical compaction. The worms can’t live there because the house is broken. You must fix the structure first. Conversely, if you have a great VESS score but still have few worms, your problem isn’t physical. You need to investigate other limiting factors: is there enough food (crop residues, manure)? Is the pH too low? This diagnostic logic prevents you from applying the wrong solution to the problem.
This is backed by UK-based research, where research from AHDB’s Strategic Cereal Farm network demonstrates that zero-till systems consistently show higher populations of deep-burrowing (anecic) earthworms. These are the worms that create permanent vertical burrows, acting as superhighways for water infiltration and root growth, making their presence a superior indicator of good hydraulic function.
| Assessment Method | What It Measures | Indicator Type | Diagnostic Value | Action Threshold |
|---|---|---|---|---|
| VESS (Visual Evaluation of Soil Structure) | Physical soil structure: aggregate size, porosity, root penetration | Leading indicator of physical potential | Reveals if the ‘house’ (soil structure) can support biological life | Score 1-2: Good; Score 3: Monitor; Score 4-5: Action required |
| Earthworm Count | Biological activity and soil food web health | Lagging indicator of biological reality | Reveals if ‘inhabitants’ (soil organisms) are thriving in the structure | >8 adults+juveniles per pit: Active population for arable soils |
| Diagnostic Logic | If VESS is poor (4-5) but worm count low → Fix physical structure first (compaction is primary limit). If VESS is good (1-2) but worm count low → Address chemical (pH) or food (organic matter) constraints. | Use both in combination for complete diagnosis | ||
The Tyre Pressure Error That Ruins Soil Structure for 5 Years
We’ve talked about fixing compaction, but the most cost-effective strategy is preventing it in the first place. One of the single biggest causes of deep, lasting compaction on farms today is not the total weight of machinery, but the pressure exerted on the ground, and that comes down to one simple, controllable factor: tyre pressure. Running tractors and implements with overinflated tyres on moist soil is a recipe for disaster. A hard tyre creates a small, concentrated footprint, driving pressure deep into the soil profile. A softer tyre creates a long, wide footprint, “floating” the machine’s weight over a larger area.
The difference is not trivial. A study by Pennsylvania State University Extension found that running a machine with tyres at 35 PSI caused ruts more than twice as deep and created significant stress at a 14-inch depth compared to the same machine with tyres at 12 PSI. This deep compaction, caused by high axle loads on hard tyres, is the most damaging. It occurs below the normal cultivation depth and can persist for many years, restricting root growth and water movement in the subsoil.
The visual evidence is stark. A high-pressure tyre leaves a narrow, deep rut, while a low-pressure tyre leaves a wide, shallow impression. The damage isn’t just cosmetic; it has a direct impact on your bottom line. Data from an international soil compaction project showed that compaction from 10-12 ton axle loads reduced yields by approximately 15% in the first year. Even a decade after the compaction event, a yield penalty of 3-5% was still measurable. This is a long-term mortgage taken out on your farm’s productivity, all for the sake of not spending a few minutes adjusting tyre pressures before entering a field.
Modern VF (Very High Flexion) and IF (Increased Flexion) tyres are designed to run at these lower pressures, but they only work if they are set correctly for the load and speed. Taking the time to check and adjust pressures based on the task is one of the highest-return management activities you can perform. It is the frontline defence in the war against compaction.
When to Intervene Mechanics: The 3 Dry Days Rule You Must Follow
Every farmer knows the rule: “don’t travel on wet ground.” But how wet is too wet? And how do you know when it’s safe to go? Relying on a calendar or simply how the surface looks can be deceptive. A field might look dry on top but be saturated just a few inches down, right where a plough or cultivator will do immense smearing and structural damage. The “3 Dry Days Rule” is a good starting point, but it’s not foolproof. A more reliable method is a simple, hands-on test: the plastic limit test.
This test tells you if your soil is in a “plastic” state—that is, wet enough to be moulded and deformed, which is exactly when it is most vulnerable to compaction and smearing from machinery. The procedure is simple: take a handful of soil from the depth you intend to work and roll it between your palms to form a thin “worm”. If you can roll the soil into a worm about 3mm thick (the diameter of a pencil lead) without it crumbling, your soil is too wet to work. It has failed the test. At this moisture content, the weight and action of tyres and implements will smear clay particles and destroy soil aggregates, creating a dense, impermeable layer.
If, however, the soil worm crumbles and breaks apart before you can get it that thin, the soil is dry enough to be “friable”. It has passed the plastic limit test. In this state, it will shatter and break into aggregates when cultivated, rather than smearing. This is the state you should always aim for before any cultivation or heavy traffic. General guidance often supports this practical test; for instance, soil science guidance from Rutgers University recommends you wait 2-3 days after a rainstorm before even assessing compaction, reinforcing the need for patience.
- Step 1: Collect a soil sample from your intended working depth (e.g., 0-15cm).
- Step 2: Roll the soil between your palms to form a thin cylinder or ‘worm’.
- Step 3: If you can form a worm thinner than 3mm without it breaking, the soil is TOO WET. Stop.
- Step 4: If the worm crumbles before reaching 3mm, the soil has passed the plastic limit test and is workable.
- Step 5: Repeat this test in several spots, especially in lower-lying areas of the field.
Why Your Drains Are Running Clear While Water Stands on the Surface?
It’s a frustratingly common sight after heavy rain on clay soils: the field drains are running, and the water is clear, yet there are still puddles and standing water across the field surface. This tells a very specific story. Clear-running drains mean your expensive, deep drainage system is working perfectly. The problem isn’t in the subsoil; it’s right at the surface. You’re dealing with a surface cap or seal.
This impermeable crust, often only a few millimetres thick, is acting like a layer of cling film, preventing rainwater from infiltrating the soil profile and reaching the drains below. As the experts at AHDB point out, this is a classic symptom of poor surface structure. In their guide to soil assessment, they explain the phenomenon perfectly:
Clear-running drains mean the deep drainage system works, but the problem is at the surface. This capping is caused by several factors, including the impact of heavy raindrops on bare soil which shatters fine aggregates, and potential chemical imbalances with sodium in some clays which causes particles to disperse and block pores.
– AHDB Soil Health Research, How to assess soil structure
The solution, therefore, isn’t to put in more drains or to subsoil aggressively. Doing so would be a waste of time and money, as it doesn’t address the surface issue. The goal is to break the surface seal with minimal disturbance and implement strategies to prevent it from forming again. This involves protecting the soil surface and improving the stability of the aggregates. Keeping the soil covered with a growing crop or a layer of residue is the number one priority, as it absorbs the explosive energy of raindrops. For immediate remediation, very shallow, low-disturbance tools are required.
Here are several targeted solutions for dealing with surface sealing:
- Use a star-tiller or rotary hoe at a very shallow depth (less than 5cm) to gently fracture the crust.
- On grassland, a sward slitter or aerator can create vertical channels to help water get through the cap.
- Apply gypsum (calcium sulphate) as a surface amendment. The calcium helps flocculate clay particles, binding them together into more stable aggregates.
- Increase aggregate stability long-term by incorporating compost or other well-decomposed organic matter.
Why Straw Incorporation Alone Won’t Build Stable Humus Rapidly?
For years, the advice for improving soil organic matter has been simple: chop and incorporate straw. While returning this carbon-rich material to the soil is far better than baling and removing it, many farmers find that this practice alone doesn’t lead to the rapid build-up of stable, long-lasting humus they were hoping for. The soil seems to “burn through” the straw, with little net gain in organic matter over time. Why is this?
The reason lies in a crucial, often-overlooked part of the humus-building process. Stable humus isn’t just rotted straw. It’s a complex substance built by soil microbes. And like any workforce, these microbes need a balanced diet. Straw provides a huge amount of carbon (the ‘brown’ material), but it’s relatively low in nitrogen (the ‘green’ material). To decompose the straw, microbes must scavenge nitrogen from the soil, which can temporarily lock it up and make it unavailable to the following crop. More importantly, straw provides only one half of the ideal food source.
The missing link is the ‘liquid carbon’ pathway. As the SARE Cover Crops research program highlights, the most effective humus-builders are living plants.
Stable humus isn’t just decomposed straw. It’s built by microbes feeding on both high-carbon straw and the sugary ‘liquid carbon’ exudates from living plant roots. The living root is the missing link.
– SARE Cover Crops Research
Living roots constantly leak out a cocktail of sugars, proteins, and carbohydrates into the soil around them (the rhizosphere). This is an easily digestible, energy-rich food source that stimulates a population boom in soil microbes. When these microbes also have access to a high-carbon source like straw, they have the perfect balanced diet to thrive, multiply, and, in doing so, build stable humus compounds. Incorporating a cover crop after harvest, therefore, is not just about adding more biomass; it’s about providing the living root that supercharges the entire soil food web and turns incorporated straw into a valuable asset rather than a short-term carbon snack.
Key takeaways
- Your spade is your most powerful diagnostic tool. Use it to read the physical language of your soil—its structure, colour, and root patterns—to identify compaction without a lab.
- Employ ‘biological machinery’. Deep-rooting cover crops can break up plough pans more effectively and cheaply than steel, building lasting soil structure.
- Timing is everything. Use the simple ‘plastic limit’ hand test to ensure soil is dry enough to carry machinery, preventing years of structural damage in a single pass.
Building Long-Term Hydraulic Resilience on Clay Soils
Everything we have discussed—diagnosing compaction, using cover crops, managing traffic, and building humus—comes together to achieve one ultimate goal: hydraulic resilience. This is a soil’s ability to handle the extremes of the UK climate. It means having a soil that can rapidly infiltrate water during a torrential downpour to prevent flooding and run-off, and also having a soil that can store that water deep in its profile to sustain a crop through a dry spell. It’s the opposite of a ‘brittle’ soil that either floods or turns to concrete.
Building this resilience on heavy clay is not a quick fix; it’s a multi-year process of shifting from a system reliant on mechanical intervention to one managed by biology. It requires a strategic plan. You can’t simply do one thing; you need to stack beneficial practices over time, allowing them to build on each other. The High Weald AONB’s landowner guidance reinforces this approach, proving that UK farmers can effectively monitor and improve soil health using these simple, cost-free field assessments, making it an accessible goal for any farm.
The journey starts with creating macropores with roots, then feeding the soil life that will maintain those pores, and finally, protecting that new, fragile structure from damage. Each year, the soil’s ability to manage water will improve. Water will get in faster, be held longer, and your reliance on drainage and irrigation will decrease. This is not just about better soil; it’s about building a more profitable and sustainable farming business.
Your Action Plan: 3-Year Strategy for Hydraulic Resilience
- Year 1: Create Pores. Plant a diverse cover crop mix with both deep taproots (e.g., tillage radish, chicory) and fibrous roots (e.g., cereal rye, phacelia) to create a network of vertical and horizontal channels through the soil profile.
- Year 2: Feed Biology. Introduce compost or manure applications to provide a diverse food source for soil organisms. This will feed the microbes and earthworms needed to stabilize the pores created in Year 1. Aim to increase organic matter by 0.5% a year.
- Year 3: Preserve Structure. Reduce tillage intensity. Transition from deep ploughing to a shallow cultivation or direct drill system. This protects the newly created pore structure and worm channels from mechanical destruction.
- Ongoing: Monitor Inhabitants. Check earthworm populations annually in the spring or autumn. Your target is a healthy, active population of more than 8 worms per spadeful in your arable soils.
- Ongoing: Protect Your Asset. Always use the plastic limit hand test before any field operation. If the soil is too wet, stay off. This single discipline will protect all the gains you have made.
Start this season. Take a spade, walk into your most problematic field, and begin the process of reading your soil. The answers are there, waiting to be discovered.