Complying with on-farm composting rules isn’t about navigating red tape; it’s about mastering a biological process where regulations are simply quality control markers.
- The T23 exemption is a framework for low-risk, high-value operations, not a barrier.
- Key process controls (temperature, C:N ratio, site selection) are your best tools for both compliance and creating a superior soil amendment.
Recommendation: Shift your mindset from “waste disposal” to “biological asset creation” to turn a regulatory burden into a profitable farm resource.
For many farmers, the words “waste regulations” trigger a sense of apprehension. You see the potential in that pile of woodchip, green waste, or livestock manure, but the thought of navigating the Environment Agency’s rules feels like a minefield. The common advice is often to “just follow the rules,” but this misses the point entirely. The fear of a compliance breach, a failed inspection, or an environmental incident can be enough to deter even the most resourceful farm business from tapping into this valuable on-site resource.
But what if the path to compliance wasn’t about memorising legal text, but about mastering a process you already understand: biology? The secret to successful, compliant on-farm composting isn’t found in legal loopholes but in understanding the science behind it. When you focus on creating the perfect conditions for decomposition, you don’t just produce high-quality compost; you inherently meet the very standards the regulations are designed to uphold. The rules cease to be a burden and become a simple checklist confirming you’re doing things right.
This guide reframes the challenge. We will move beyond the fear of non-compliance and into the realm of process control. We’ll explore how to leverage the T23 exemption as an opportunity, not a constraint. You will learn how technical actions, like monitoring temperature and balancing materials, are not just regulatory hoops but powerful levers for creating a valuable biological asset for your farm. This is about turning a perceived liability into a cornerstone of a more resilient and circular farming system.
This article breaks down the essential steps and strategic considerations for establishing a compliant and efficient on-farm composting operation. From navigating the legal framework to mastering the biological process, each section provides the precise, reassuring advice needed to move forward with confidence.
Summary: A Farmer’s Guide to Compliant On-Farm Composting
- Why the T23 Exemption is Crucial for On-Farm Composting?
- How to Monitor Compost Temperature to Kill Weed Seeds Effectively?
- Windrow Turner vs Front Loader: Which Produces Quality Compost Faster?
- The Site Selection Mistake That Leads to Groundwater Contamination
- How to Balance Straw and Slurry to Heat Up Your Compost Pile?
- Woodchip or Manure: Which Builds Long-Term Carbon More Effectively?
- How to Brew Compost Tea That Actually Works on UK Arable Crops?
- How to Close the Nitrogen Loop Using Livestock Manure Effectively?
Why the T23 Exemption is Crucial for On-Farm Composting?
The T23 exemption is not a barrier; it’s the gateway for farms to legally compost specific waste types without needing a full, complex environmental permit. Think of it as a pre-approved, low-risk operational framework. Its purpose is to enable smaller-scale composting where the environmental impact is considered minimal, provided certain conditions are met. Understanding this framework is the first step toward transforming your farm’s organic waste from a disposal problem into a valuable resource. The key is to see the rules not as restrictions, but as the operating parameters for a safe and effective system.
The most critical conditions of the T23 relate to the types and quantities of waste. The system is designed for materials commonly found on farms and in rural settings, such as plant tissue, wood, and certain animal-derived wastes. The tonnage limits are a core part of its “low-risk” status. According to the UK Environment Agency T23 exemption rules, you can treat up to 80 tonnes at any one time if the waste is produced and used on-site. This figure includes raw materials, actively composting material, and finished compost, so accurate record-keeping is essential. Failing to account for all stages is a common pitfall that can lead to non-compliance.
To remain compliant, you must treat the T23 as a professional process. This involves more than just registering online every three years. It requires diligent record-keeping of quantities, waste types, and treatment dates. It’s also vital to respect storage time limits: Table 1 wastes (like vegetation) can be stored for a maximum of one month before treatment, while Table 2 wastes (like food) have a stricter limit of seven days. Mastering these simple administrative and operational disciplines ensures you stay well within the exemption’s boundaries, allowing you to focus on what matters most: producing quality compost.
How to Monitor Compost Temperature to Kill Weed Seeds Effectively?
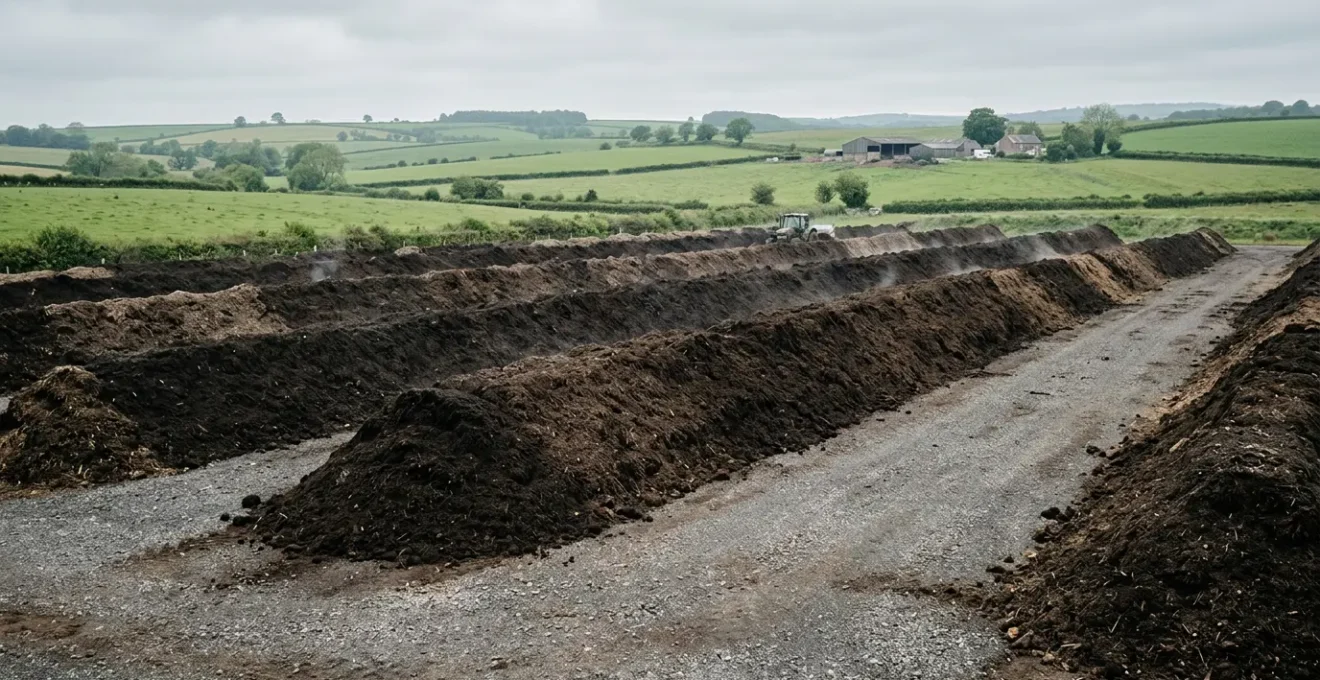
Achieving a high temperature in your compost pile is not just a sign of good biological activity; it’s a critical sanitisation step. From a compliance and agronomic perspective, this is where you actively manage the risk of spreading problems across your farm. The primary goal of the thermophilic (hot) phase is to destroy pathogens and, crucially, to kill weed seeds. Spreading compost full of viable weed seeds is counterproductive and can create significant problems in future crops. Therefore, temperature monitoring is a non-negotiable part of quality control.
The key is to reach and maintain a specific thermal threshold. Extensive research from the Cornell Waste Management Institute confirms that a sustained temperature of 55°C (131°F) for several consecutive days is effective at killing most common weed seeds and pathogens. To achieve this, you need a long-stem compost thermometer (at least 1 metre long) to accurately measure the core temperature of your windrow or pile. Readings should be taken from several locations within the pile, as the edges will always be cooler than the centre. Turning the pile is essential to ensure that all material is exposed to this sanitising heat.
As the image above suggests, the heat is a visual indicator of intense microbial work. This process has a direct impact on the viability of different weed species, some being more resilient than others. Understanding these thermal death points allows for a more targeted approach to compost management.
The following table details the specific time and temperature requirements needed to achieve a high mortality rate for common UK farm weeds, demonstrating the precision required for effective sanitisation.
| Weed Species | Temperature (°C) | Exposure Time | Mortality Rate |
|---|---|---|---|
| Barnyardgrass | 50°C | 24-48 hours | 90%+ |
| Black nightshade | 50°C | 48-72 hours | 90%+ |
| Common purslane | 50°C+ | 72+ hours | 90%+ |
| Annual sowthistle | 50°C | 24-48 hours | 90%+ |
| Most weed seeds (general) | 55-65°C | 3-7 days | 95%+ |
Windrow Turner vs Front Loader: Which Produces Quality Compost Faster?
The method used to turn compost piles is one of the most significant factors influencing both the speed of the process and the quality of the final product. While a front-end loader is a versatile machine already present on most farms, a dedicated windrow turner represents a specialist investment. The choice between the two is a classic case of balancing upfront cost against long-term performance and efficiency. A front loader simply moves and re-piles material, whereas a windrow turner is engineered to shred, aerate, and mix the material, dramatically accelerating the biological process.
The primary advantage of a front loader is its low initial cost, as the machinery is typically already owned. However, it is less efficient at aerating the pile. It tends to compact the material as it drives over it, and it doesn’t create the fluffy, homogenous mixture that microbes thrive in. This can lead to anaerobic pockets, slower decomposition, and a less stable final product. A windrow turner, by contrast, injects a significant amount of oxygen and ensures every particle is mixed, leading to more consistent temperatures and faster processing times. While the initial investment is higher—a University of Wisconsin study found an investment of $487 per cow for a compost turner versus $256 per cow for a front-end loader on a dairy farm—the benefits in process efficiency and product quality can justify the cost.
The superior performance of a dedicated turner is not just anecdotal; it is measurable in the chemical properties of the finished compost, particularly its Cation Exchange Capacity (CEC), a key indicator of soil fertility and nutrient retention.
Case Study: Windrow Turner’s Impact on Compost Quality
A 2024 study comparing mechanized windrow turners to manual turning methods demonstrated that machine-turned compost achieved significantly higher cation exchange capacity (CEC) values. The improved aeration, temperature regulation, and homogeneity from the windrow turner enhanced microbial activity and humus formation. This led to superior nutrient retention capabilities in the final product, effectively creating a more valuable biological asset. The machine-turned pile also produced more finished compost (13,768 kg vs 11,512 kg), showcasing greater efficiency in converting raw materials.
Ultimately, the decision rests on your operational scale and goals. For small quantities under the T23 exemption, a front loader may suffice. But for those looking to produce a consistent, high-quality soil amendment as a core part of their farm’s nutrient strategy, a windrow turner is a strategic investment in process control.
The Site Selection Mistake That Leads to Groundwater Contamination
Before a single piece of organic matter is piled up, the single most important decision is made: site selection. This choice has profound and long-lasting implications for environmental compliance and risk management. A poorly sited compost pad can lead to the contamination of groundwater with nitrates or the pollution of surface water with runoff, resulting in serious regulatory breaches and environmental harm. The core challenge lies in the soil itself, as explained by experts.
If the soils are impermeable, groundwater is protected from nitrate pollution, but runoff is maximized which increases the BOD, phosphorus, and pathogen threat to surface water. On the other hand, highly permeable soils reduce the runoff potential but may allow excessive nitrate infiltration to groundwater.
– Cornell Waste Management Institute, Water Quality Protection – Cornell Composting
This quote perfectly captures the site selection dilemma. You must find a “Goldilocks” location—not too permeable, and not too impermeable. Highly sandy or gravelly soils pose a high risk of leaching, where leachate (the liquid that seeps from the compost pile) moves too quickly downwards, carrying nitrates and other contaminants directly into the groundwater. Conversely, heavy clay soils prevent leaching but increase the risk of runoff, where contaminated water flows over the surface into ditches, streams, and ponds. The ideal site, therefore, has a heavier soil with a slow infiltration rate, such as a silty clay loam, and a gentle slope that allows for the management of any potential runoff.
Beyond soil type, other geographical factors are critical. The site must not be in a flood-prone area or have a high seasonal water table. Regulations typically require a minimum vertical buffer between the base of the compost pile and the water table. Horizontal buffers are equally important, with minimum distances required from wells, rivers, and other sensitive water bodies. This is a classic example of “compliance by design”: by choosing the right site from the outset, you design out the majority of environmental risks before they can even occur.
Action Plan: Key Checks for Leachate-Safe Site Selection
- Choose heavier soils with slower infiltration rates (silty clay loam preferred) over excessively well-drained sandy soils to reduce leaching risk.
- Avoid sites with shallow aquifers, high seasonal water tables, or flood-prone areas that increase contamination risk.
- Ensure a minimum 2-foot vertical buffer above the seasonally high water table as required by regulations.
- Maintain horizontal buffers of at least 200 feet from wells or surface water bodies and 25 feet from drainage swales.
- Install vegetative filter strips or bioswales on downhill slopes to capture and treat any potential runoff if necessary.
How to Balance Straw and Slurry to Heat Up Your Compost Pile?
The engine of a compost pile is its microbial population, and like any living workforce, it needs a balanced diet to perform. The “heat” you want to see is a direct byproduct of their metabolic activity. To get your pile to heat up effectively, you must provide the right recipe of materials, focusing on two key ingredients: carbon and nitrogen. In a farm context, this often translates to balancing “browns” like straw (high in carbon) with “greens” like slurry or manure (high in nitrogen). Getting this balance right, known as the Carbon-to-Nitrogen (C:N) ratio, is the secret to initiating a rapid and sustained thermophilic phase.
The ideal C:N ratio is not a single number but a range. According to Oregon State University Extension research, a starting C:N ratio of 25:1 to 40:1 is optimal. If the ratio is too high (too much carbon/straw), microbes won’t have enough nitrogen to build their populations, and the decomposition process will be slow and cool. If the ratio is too low (too much nitrogen/slurry), the excess nitrogen can be lost to the atmosphere as ammonia gas—a pungent smell and a loss of valuable nutrients. This is also where moisture comes in. Slurry provides both nitrogen and crucial moisture. The ideal moisture content is between 40-60%. Too dry, and microbial activity ceases; too wet, and the pile becomes anaerobic and smelly.
A practical way to think about it is that the straw provides the fuel (carbon) and the physical structure (porosity for air), while the slurry provides the protein (nitrogen) and the moisture that brings the microbes to life. The process is a bit like baking a cake: you can’t just throw the ingredients in a pile. They need to be thoroughly mixed to ensure every microbe has access to the food, water, and air it needs. A well-mixed pile with the correct C:N ratio and moisture content will often show a significant temperature increase within 24 to 48 hours. This proper management doesn’t just create heat; it makes the heat more effective, as a study on weed seed destruction in Nebraska demonstrated that moist compost was far more effective at killing various weed seeds than dry compost, due to the higher temperatures achieved.
Woodchip or Manure: Which Builds Long-Term Carbon More Effectively?
When creating compost, the choice of feedstock determines not only the nutrient profile of the final product but also its contribution to long-term soil structure and carbon sequestration. The two materials, woodchip and manure, play fundamentally different roles in this process. Manure is a source of relatively unstable, fast-release nutrients, while woodchip is a source of highly stable, long-lasting carbon. Understanding this difference is key to designing a compost that meets your specific agronomic goals, whether that’s immediate fertility or building soil resilience for decades to come.
Manure and other nitrogen-rich materials like slurry are rich in labile carbon. This form of carbon is easily consumed by microbes, leading to a rapid decomposition process and the quick release of plant-available nutrients like nitrogen and phosphorus. This is excellent for providing an immediate boost to crops. However, this carbon is quickly cycled and does not contribute significantly to the stable, long-term carbon pool in the soil known as humus. It’s a short-term energy source for the soil ecosystem.
Woodchip, on the other hand, is composed of lignin and cellulose—complex, recalcitrant forms of carbon. Microbes find this material much harder to break down. This slow decomposition process is exactly what makes it so valuable for building long-term soil carbon. The fungi that specialize in breaking down woody material are instrumental in forming complex, stable humus. Applying woodchip-rich compost is like making a long-term investment in your soil’s structure, water-holding capacity, and carbon stock. A 2020 study by Zhang et al. found that co-composting materials to achieve a starting C:N ratio of 30:1 resulted in a stable, mature compost with an ideal final ratio, perfect for both nutrient availability and long-term stability.
The most effective strategy often involves a blend of both. By co-composting woodchip with manure, you provide both the immediate nutrients from the manure and the stable carbon structure from the wood. This creates a balanced biological asset that can feed the current crop while simultaneously building a more resilient and fertile soil foundation for the future.
How to Brew Compost Tea That Actually Works on UK Arable Crops?
Compost tea is not a fertiliser; it’s a liquid microbial inoculant. The aim is not to feed the plant directly with nutrients, but to populate the leaf surfaces and soil with a diverse community of beneficial bacteria, fungi, and protozoa. When brewed correctly, it can help suppress diseases, improve nutrient cycling, and enhance plant health. However, when brewed incorrectly, it can be ineffective at best and a potential source of harmful pathogens at worst. The key to a successful brew lies in two areas: starting with high-quality, pathogen-free compost and maintaining aerobic conditions throughout the brewing process.
The quality of your starting material is paramount. You cannot make good tea from poor compost. The compost must have gone through a full thermophilic phase to ensure pathogens have been eliminated. According to the USDA organic certification standards, compost used for tea must have reached a minimum of 55°C (131°F) for at least 3 days with turning. This is a critical safety and quality control step. Using immature or cool-processed compost risks multiplying harmful bacteria like E. coli or Salmonella, which would be disastrous if applied to food crops.
The brewing process itself is all about encouraging the “good” microbes to multiply. This requires a food source (like molasses or fish hydrolysate) and, most importantly, a constant supply of oxygen. An aquarium pump with air stones is typically used to vigorously bubble air through the water-compost mixture for 24 to 48 hours. This aerobic environment is crucial. If the brew becomes anaerobic (lacking oxygen), it will start to smell foul, and pathogenic organisms can proliferate. The finished tea should have a pleasant, earthy smell. A foul or sour smell is a clear sign that the brew has gone bad and should be discarded, never sprayed on crops. Using potable water is also a strict requirement to avoid introducing contaminants from the start. By adhering to these principles, you shift from making a random “slurry” to brewing a targeted, living inoculum.
Key Takeaways
- Compliance with composting regulations is a natural outcome of mastering the biological process, not an extra burden.
- Temperature control (reaching 55°C) is your primary tool for sanitising compost, killing weed seeds and pathogens to create a safe product.
- The choice of equipment and site selection are foundational strategic decisions that determine the efficiency and environmental safety of your operation.
How to Close the Nitrogen Loop Using Livestock Manure Effectively?
For any livestock farm, manure is not a waste product; it’s a nutrient-rich resource. The primary challenge is managing it in a way that captures its value—particularly its nitrogen content—while preventing it from becoming an environmental pollutant. Effective composting is the single most powerful tool for achieving this, allowing you to stabilise the nutrients and “close the nitrogen loop” on your farm. This means the nitrogen exported from your fields in crops is returned in a stable, plant-available form, reducing the need for synthetic fertilisers and minimising environmental losses.
The key to retaining nitrogen during composting is managing the C:N ratio and moisture content. When raw manure with a low C:N ratio is left in a pile, much of its nitrogen is lost as ammonia gas. This is not only a loss of a valuable nutrient but also an air pollutant. By blending the manure with a high-carbon material like straw or woodchip, you “lock up” that volatile nitrogen. The microbes use the excess carbon and nitrogen to build their own bodies, incorporating the nitrogen into stable organic forms. Cornell research shows that increasing the C:N ratio from 30:1 to 40:1 and decreasing moisture from 60% to 50% significantly reduces nitrate leaching while still maintaining an effective decomposition rate.
Beyond the recipe, simple management practices can have a huge impact on nutrient retention. The physical orientation of your compost windrows is a prime example. As research from the Cornell Waste Management Institute demonstrates, windrows should be positioned parallel to the slope of the site. This allows rainwater landing between the piles to run off cleanly, rather than soaking into the sides of the piles and leaching out nutrients. This simple, no-cost technique provides an extra margin of environmental safety and helps keep valuable nitrogen exactly where you want it: in your compost. By combining a balanced recipe with smart management, you transform raw manure from a potential liability into a stabilised, high-value biological asset that fuels your farm’s fertility.
By shifting your perspective from waste management to biological process control, you can turn the regulatory requirements of on-farm composting into a framework for excellence. The next logical step is to assess your own farm’s resources and site to develop a specific action plan.